You paste a link into LinkedIn and the preview looks fine. You paste the same link into Facebook and the image is cropped, blurry, or missing entirely. Welcome to the chaos of social sharing.
Every platform has its own rules for how it renders link previews. Different image sizes, different file types, different behaviours for posts versus DMs. If you want your content to look professional when people share it, you need to know the specs and have a process.
This is that process.
What Are OG Images and Why Do They Matter?
OG stands for Open Graph, a protocol Facebook created so websites could control how their links appear when shared on social media. You add a few meta tags to your page's HTML and platforms pull that data to generate a preview card.
The two tags that matter most:
- og:image: The URL of the image you want displayed.
- og:title and og:description: The text that appears with the image.
When someone shares your link, platforms scrape these tags and build a preview. If you don't set them, the platform guesses. And it guesses badly.
Without OG tags. A naked URL the reader has to decide whether to trust.
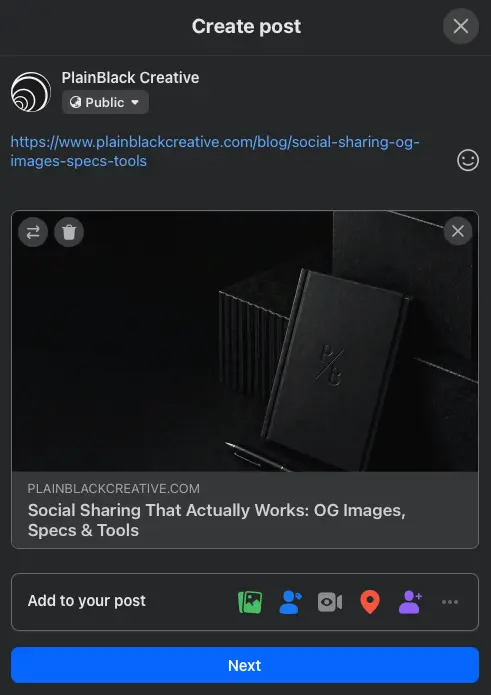
With OG tags set. A preview that does the work for you.
Platform Specs: What Works Where
Here's what each platform wants. These are current as of early 2025, but platforms change specs without warning.
- Recommended size: 1200×630px
- Aspect ratio: 1.91:1
- File types: JPG, PNG, WebP
- Max file size: 8MB (but keep it under 1MB for faster load times)
- Minimum size: 600×315px (anything smaller may not display)
- Recommended size: 1200×627px
- Aspect ratio: 1.91:1
- File types: JPG, PNG (no WebP support as of 2025)
- Max file size: 5MB
LinkedIn is pickier than Facebook. If you upload a WebP file, the preview won't render. Stick to JPG or PNG.
Twitter/X
- Recommended size: 1200×675px
- Aspect ratio: 16:9
- File types: JPG, PNG, WebP
- Max file size: 5MB
Instagram and TikTok
Neither platform supports clickable links in regular posts. You can put a link in your bio or use Stories (Instagram) or the video description (TikTok), but there's no OG preview to control.
For Instagram, if you're running ads or have a business account with the swipe-up feature, the preview specs are 1080×1080px (square) or 1080×1920px (vertical story format).
For TikTok, links only appear in your bio. No OG image is pulled.
Link in bio vs link as post: If your audience is on Instagram or TikTok, you're stuck with link-in-bio or driving people to Stories. It's not ideal, but it's the trade-off for being on those platforms. On Facebook, LinkedIn, and Twitter, always post the link directly so the OG image does the work.
Testing Your Links: Scrape and Debug Tools
Before you share a link publicly, test it. Platforms cache OG images aggressively, so if you update your image after someone's already shared the link, the old version may keep appearing for days.
Here are the tools you need:
Facebook Sharing Debugger
Go to developers.facebook.com/tools/debug. Paste your URL, click "Debug", and Facebook will show you exactly what it sees. If the image is wrong, click "Scrape Again" to force a refresh.
LinkedIn Post Inspector
Go to linkedin.com/post-inspector. Same deal. Paste your URL, see the preview, clear the cache if needed.
Twitter Card Validator
Go to cards-dev.twitter.com/validator. Enter your URL and see how the card renders. Twitter doesn't let you force a re-scrape as easily, so get it right the first time.
Use these tools every time you publish a new page or update an existing one. Don't assume it worked.
Image Creation: Tools and Prompts
You don't need a designer to create OG images. You need a process and the right tools.
Squoosh for Resizing and Converting
Squoosh.app is a free, browser-based tool from Google. Upload an image, set your dimensions (e.g. 1200×630), choose your format (JPG for LinkedIn, WebP for Facebook if you want smaller file sizes), compress it, and download.
It's fast, it's free, and it doesn't require a login. Use it for every OG image you create.
ChatGPT for Image Generation
If you're starting from scratch, use ChatGPT's image generation (DALL-E) or a standalone tool like Midjourney. Here's how to write a prompt that doesn't produce generic stock-photo garbage:
Prompt Structure for OG Images
Subject + Style + Composition + Mood. Example: "A close-up of a laptop screen showing analytics graphs, flat illustration style, centered composition, mint and dark blue color palette, clean and modern."
Be specific about what you don't want. Add "no people, no faces, no cluttered backgrounds" if you want something clean.
If you're generating an image for a post about branding, try: "Abstract geometric shapes in mint green and dark blue, minimalist, editorial style, high contrast, no text."
Once you have the image, run it through Squoosh to hit the right dimensions and file size.
Alt Text: What It Is and How to Write It
Alt text (alternative text) is the text description of an image. It serves two purposes:
- Accessibility: Screen readers read alt text aloud for visually impaired users.
- SEO: Search engines use alt text to understand what an image depicts.
For OG images, alt text is set in the HTML using the og:image:alt tag. Most platforms display it if the image fails to load.
Write alt text as a single sentence describing what's in the image. Be specific, not poetic. Example: "A small business owner reviewing a printed marketing plan at a wooden desk."
Don't write "image of" or "photo of". Just describe the content. Keep it under 125 characters.
Common Mistakes and How to Fix Them
Here's what breaks most often:
- Wrong aspect ratio: You upload a square image (1080×1080) and LinkedIn crops it badly. Use 1200×627 or 1200×630 for all horizontal platforms.
- File size too large: A 5MB PNG loads slowly and may time out. Compress to under 500KB without losing visible quality.
- WebP on LinkedIn: LinkedIn doesn't support WebP. Convert to JPG or PNG.
- Not clearing the cache: You update the image but the old one keeps showing. Use the debug tools to force a re-scrape.
- No alt text: You skip the og:image:alt tag and miss an easy SEO and accessibility win.
Your Workflow
Here's the process you should follow for every page or post that includes a link:
- Create your OG image. Use ChatGPT or Midjourney for generation, or design in Canva/Figma.
- Resize and compress in Squoosh. Target 1200×630px, under 500KB, JPG or PNG for LinkedIn.
- Add the image URL to your og:image meta tag. Add a short alt text to og:image:alt.
- Test the link in Facebook Sharing Debugger, LinkedIn Post Inspector, and Twitter Card Validator.
- If the preview looks wrong, fix the image or meta tags, then scrape again.
- Share the link.
This takes five minutes. It's worth it.
If you're running ads or boosting posts, the preview is the first thing people see. A broken or low-quality OG image kills your click-through rate before anyone reads a word.
Get the specs right. Use the tools. Test before you share. Your links will look better, load faster, and convert more clicks.